
Johannesburg Mountain, Northeast Face, Route 66
Washington, North Cascades
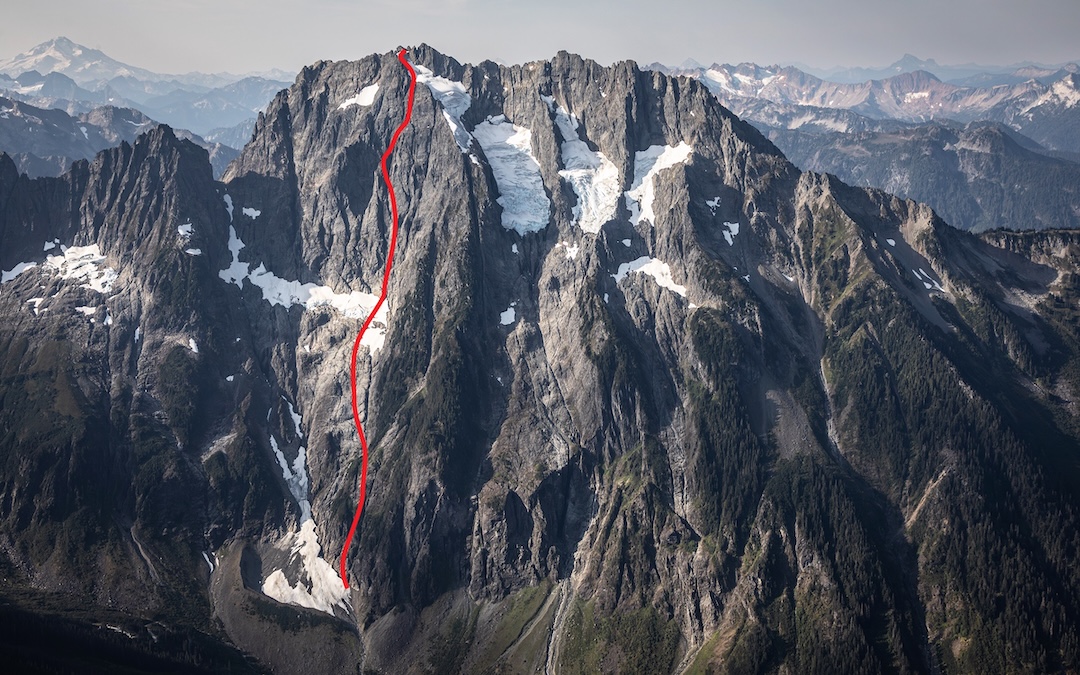
I’d been curious about the hanging northeast face of Johannesburg Mountain (8,211’, 48.46702, -121.08649) for years, studying it every time I drove up to the Cascade Pass trailhead. Most of the existing routes follow massive water-formed gullies and are reportedly terrifying funnels for rockfall. Some of the ribs between the gullies looked promising.
Lani Chapko, Eric Wehrly, and I arrived at the trailhead midmorning on September 12. Some lingering fog hung on much longer than forecasted, and eventually we grew restless and began the approach in a whiteout around 11 a.m.
The approach listed in the Beckey guide follows the outlet of the C-J Couloir, separating Johannesburg from Cascade Mountain to its east, then traverses the hanging glacier below the face. Recession of the glacier and late-season conditions meant this wasn’t feasible. We opted to follow the approach for the routes on the northeast buttress, farther to the right. This involved a fair amount of fifth-class brush and run-out, low-fifth-class slabs, all quite engaging given the wet conditions.
Some moderate bare ice on the hanging glacier gave way to an impassable moat guarding the main rock wall. We did a 60-foot rappel off a bollard into the moat, then led up moderate, glacial till–covered terrain to get established on the wall. We started up one of the main gullies in the vicinity of the two routes from the 1960s on the right side of the face before traversing out right to gain our desired rib.
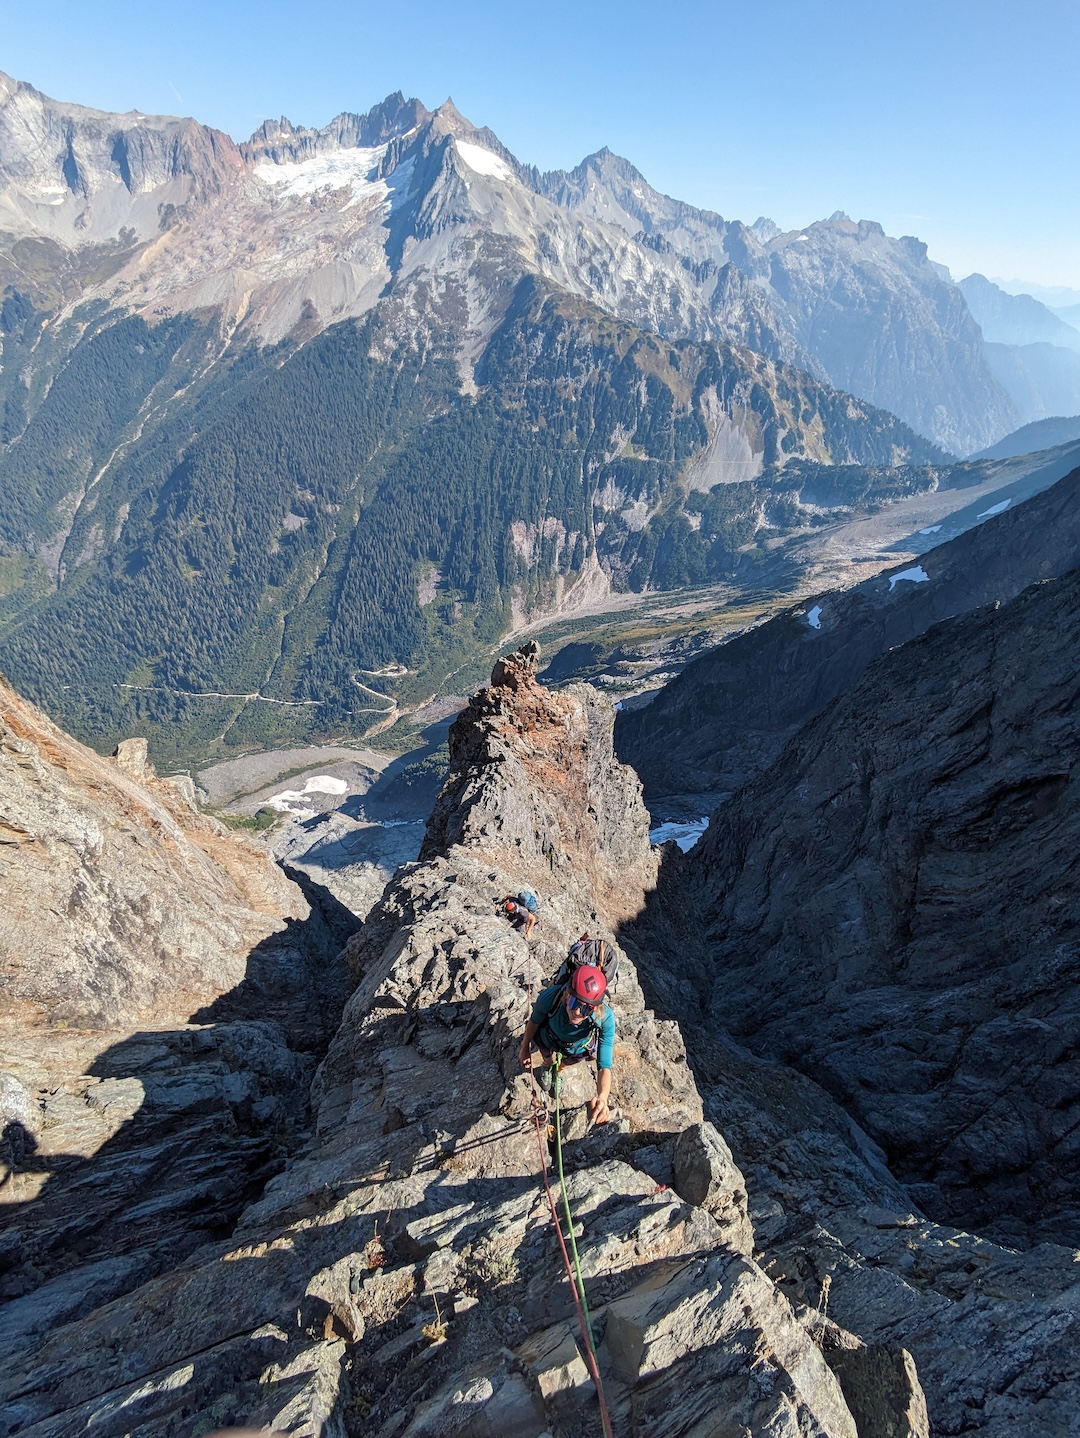
The lower third of the route had several 5.10 sections and a fair bit of run-out and at times chossy 5.9. Eric led the crux of the route as darkness fell, running the rope to its end. He eventually pieced together a tolerable but creative anchor at a semi-hanging, sloping stance. We had hoped to find a decent bivy here, and since none of us relished the idea of spending the night hanging in slings on a questionable anchor, we decided to quest upward in hopes of finding flat land. A few more pitches brought us to a stance that would comfortably fit one and a half people, but it would have to do for three!
Come morning, we were glad to be on the eastern aspect as we soaked in the first rays of sun. Starting up again, we targeted a promising-looking corner. A few pitches with less than desirable rock gave way to the sweeping upper ridges of the mountain. The wall was never overly difficult, but unrelenting moderate and run-out terrain kept us pitching things out until the bitter end. We began to joke that the wall might go on forever—we had become Sisyphus and this wall was our boulder.
We eventually topped out on the final pitch of the 1967 route (IV 5.6, Davis-Givler-McGowan), right below the steep glacier on which the northeast buttress routes finish. We quickly ran over to tag the true summit, then began the incredibly long descent down Doug’s Direct, Ptarmigan, and eventually the Cascade Pass Trail and its dozens of switchbacks. We arrived at the car around 2 a.m., pretty thrashed.
In total, we climbed around 23 pitches, with just under 4,000 feet of roped terrain and just shy of a mile of vertical gain. It’s hard to recommend Route 66 (V 5.10 AI2) for the quality of its climbing, but for those interested in this wall, it is perhaps the least objectively hazardous option.
—Sam Boyce
Route 66 (V 5.10 AI2), Route Description
Rack: Triples .3/.4; Doubles .1-.75; singles 1-3; full set of nuts; 3 knifeblades (used extensively for belays)
P1-4 (700'). Alpine boulder problem pitches getting to the base of the NE face (up to 5.8 and AI2).
P5 (130', 5.7). A transition pitch up into the gully.
P6 (200', 5.6). Climb the gully, belay in the gully.
P7 (200', 5.9). Climb the rib left of the gully, stepping back right to belay in the gully again.
P8 (150', 5.6). Exit the gully to the right. Belay on a good, medium sized ledge below where the wall steepens.
P9 (100', 5.10-). Start with a juggy roof to the right, then trend up ramps to a small ledge to the right of a large tombstone flake.
P10 (200', 5.10). Start up the flake (crux), then trend left on low angle terrain to meet the main weakness. Follow this up to a large ledge system.
P11 (200', 5.6). Traverse slabs rightward into a gully, follow it to a good ledge below a big roof.
P12 (200', 5.8). The "money pitch" Follow the gully, pulling the roof to its left, and continuing to another good ledge.
P13 (250', 5.4). Scramble up the gully, exit left and belay at a ledge positioned below a big open book corner.
P14 (160', 5.9). Work your way into the corner, belay at its top.
P15 (170', 5.6). Ramble up loose terrain on the ridge crest.
P16 (100', 5.8). Climb the super chossy ridge to a notch by a red finger.
P17 (200', 5.5). Climb past the finger then scramble up to your end of rope.
P18 (200', 5.8). Climb the grassy cracks above to gain the big chimney on the right, follow this to a stance in the chimney.
P19 (200', 5.6). Trend up and right past two gullies towards the larger drainage feature.
P20 (150', 5.9). Climb a face to gain a corner, follow this to a ledge at its top.
P21 (200', 5.7). Continue up the gully.
P22 (200', 5.7). Continue up the gully, belay at a notch on the NE butt by the glacier.
P23 (200', AI2). One pitch up the glacier.
Media Gallery